Auto responders
Auto-responders are messages that are automatically sent to customers in certain situations (e.g., when all agents are busy or when a customer has reached your business outside of support hours).
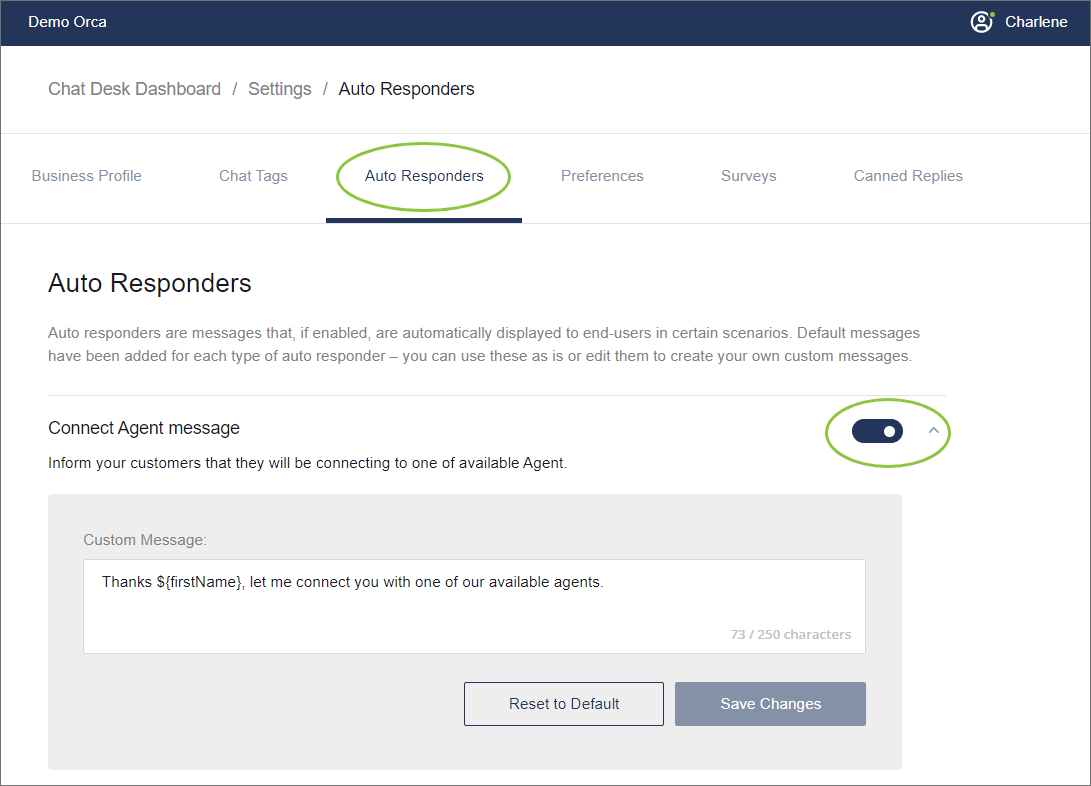
You can select which auto-responders you want to use. Default messages have been added for each type of auto-responder. These messages are customizable.
Edit or disable/enable your auto-responders
Navigate to Settings -> Auto Responders.
Enable/disable the auto-responders using the toggles.
Expand the section to display the default message.
Edit and save this message, or reset it to the default message.

Auto-responders details
Directing to Agent message
If no agents are available, an incoming chat is added to a queue and assigned to an agent as soon as one becomes available. Manage customer expectations by informing them of this.
Example: "We are directing you to the first available agent. Thank you for your patience."
Connecting Agent message
Inform a customer when they've been connected with an agent and what the agent's name is.
Example: "Thanks for your patience. You have now been connected with ${agentName}."
End Chat and Opt-Out Keywords message
This message is shown at the beginning of a new conversation with a customer to inform them how they can use keywords to end a chat with an agent or opt out of the service completely.
If the customer enters the //end command, it ends the current conversation with the agent.
If the customer enters the //stop command, the customer is opted out of the service. This means that an agent can no longer initiate a conversation with the customer until the customer initiates a conversation from their side again. The customer receives the following message: "You have blocked this contact and won't receive any messages from it in future. Should you wish to unblock this contact, simply initiate an interaction by sending any message."
Example: "You can end this chat at any time during your conversation with our agents by replying with //end. To opt out of this service, reply with //stop."
Note: Although the keywords //stop and //end can be removed/edited, this is a text update only, and does not change the actual keywords and their associated functionality. If you replace the keywords with something else, it will not affect any functionality.
Agent Busy message
Inform customers when all your agents are busy and that someone will attend to their chat as soon as possible.
Example: "Thank you for reaching out. All our agents are currently busy but will attend to you as soon as possible."
Out of Support Hours message
Manage customer expectations by informing them when they have reached you outside of support hours.
You can set your support hours under Settings -> Business Profile -> Agent Support Hours.
By default, all messages received outside of business hours are converted to tickets and queued. These will be available on Chat Desk once the agents are back online. If you would prefer not to have tickets automatically created, you can toggle the Out of Support Hours setting to OFF.
Out of Hours Support Ticket
This setting allows you to control whether a ticket will automatically be created for messages that are received outside of support hours.

When Out of Hours Support Ticket creation is ON, the following settings can be customised, and the wording for each can be edited to suit your brand tone:

End Chat message
This message is displayed to a customer when either an agent or customer closes/ends a chat. It allows you to conclude a chat in a friendly way by saying goodbye to your customers.
Example: "Thank you. Please don't hesitate to reach out if you ever need help again!"
Last updated