Chat Desk User Guide
User GuidesRelease NotesFAQsSupport
  • 🏠Return to Home Page
  • 🔎Overview
    • Chat Desk Overview
  • 💻Chat Desk Dashboard
    • Access the Chat Desk Dashboard
    • Configure Chat Desk settings
      • Business profile
      • Chat tags
      • Auto responders
      • Preferences
      • Surveys
      • Canned replies
      • Integrations
      • Clickatell AI
    • Manage departments
    • Download transcripts
  • 🤝Agent Desk
    • Access & navigate the Agent Desk
    • Manage chat queues (Agent Desk)
      • Chats and tickets
      • Manage tickets
      • Pending chats
      • Close chats
    • Search, filter, and sort chats & tickets
    • Chat capabilities
      • Send attachments (media files)
      • Send voice recordings
      • Send emoticons
      • Share locations
      • Use canned replies
      • View chat events
      • Send 1-way SMS
    • Use suggested responses (Clickatell AI)
    • Authenticate customers
    • Send payment requests via Chat 2 Pay
    • View customer details from 3rd party applications
    • Send WhatsApp message templates
    • Transfer chats
    • Manage customer profile
  • 🦸Supervisor Desk
    • Access & navigate the Supervisor Desk
    • Manage chat queues (Supervisor Desk)
      • Chats and tickets
      • Manage tickets
    • Search, filter, and sort chats & tickets
  • 📊Reporting & Analytics
    • Dashboard Metrics
    • Clickatell Portal Reports
  • 💡Help & Information
    • What's New? 🎈
    • Release Notes
    • FAQs
    • Return to Home Page
Powered by GitBook
LogoLogo

© Copyright 2024 Clickatell. All rights reserved.

On this page
  1. Chat Desk Dashboard
  2. Configure Chat Desk settings

Integrations

PreviousCanned repliesNextClickatell AI

Last updated 5 months ago

You can integrate your Chat Desk application with any of the 3rd party applications supported by Clickatell.

Currently, Clickatell supports integration with Salesforce, Zendesk Sell, Zendesk Support, and Shopify.

Every integration has a unique set of fields that can be for agents and supervisors to see (read-only).

As an admin user, you can add or remove the fields to be displayed on the tab.

Add or remove fields visible in Chat Desk

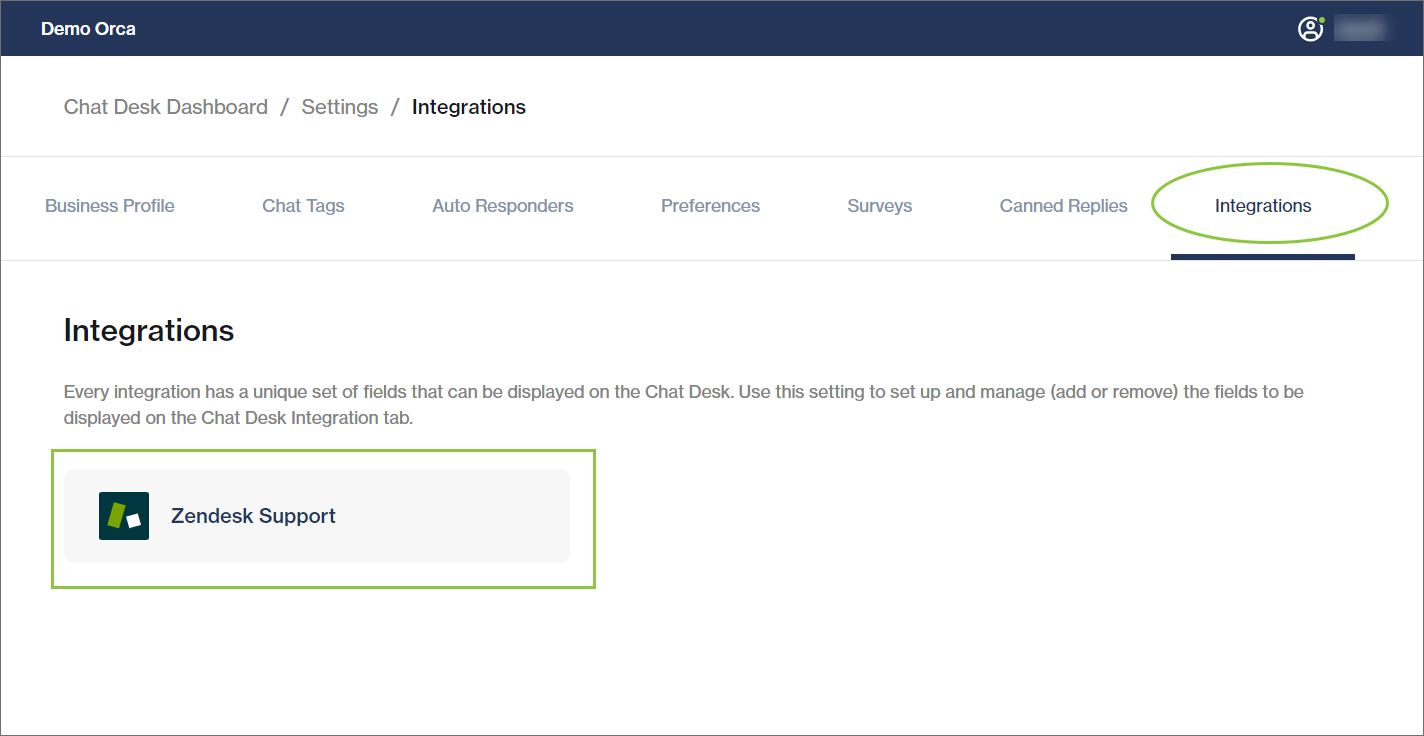
  1. Navigate to -> Integrations.

    • All the providers that are active in your Clickatell account are shown.

  2. Select the provider you want to view.
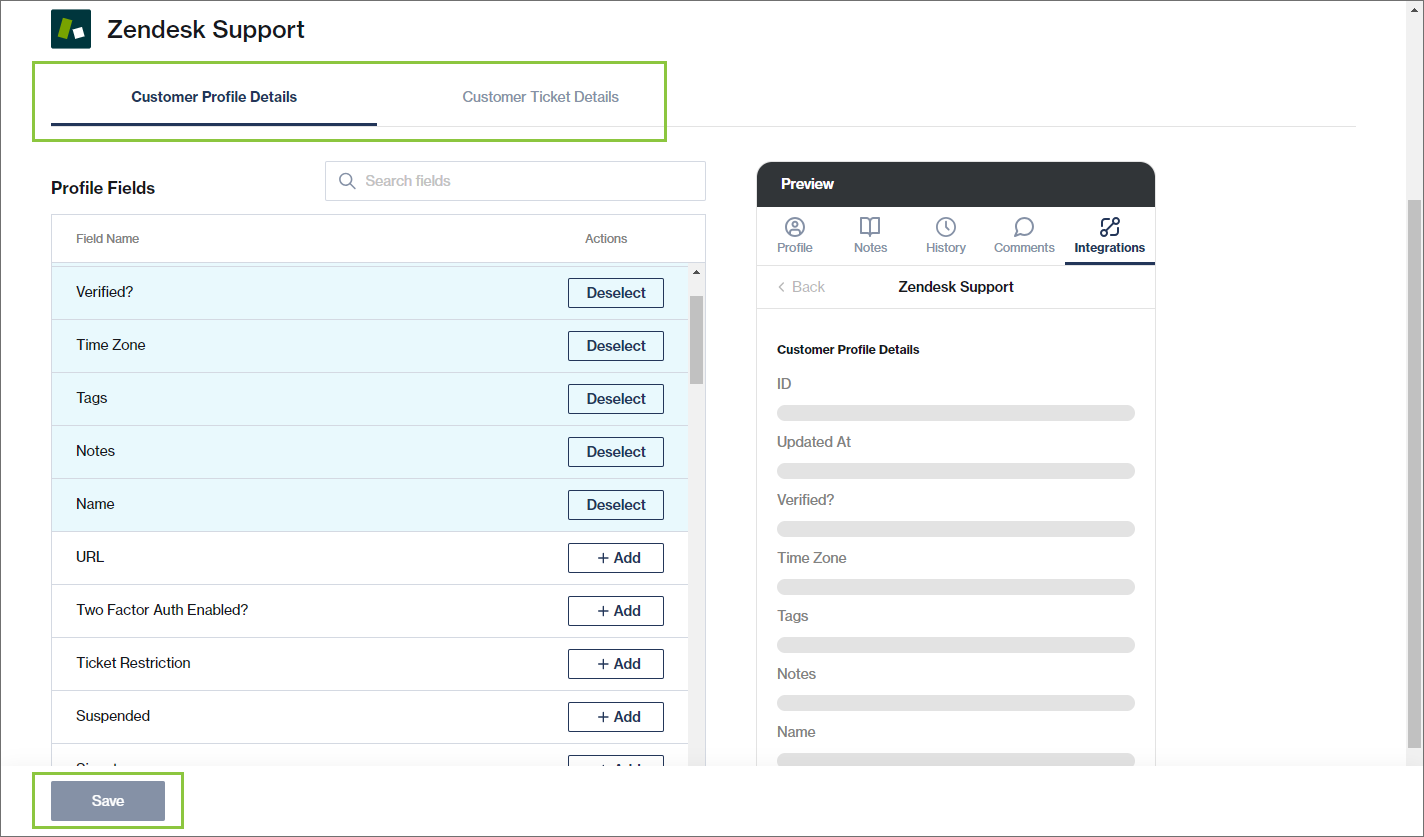
  1. You can search and select from the fields listed on the left.

    • All added fields appear at the top in blue. Some fields have been selected by default.

    • You can select up to a maximum of 10 fields.

    • You can deselect fields that are no longer needed.

  2. A preview of what will be seen in Chat Desk is shown on the right.

  3. This can be done for the Customer Profile Detail section as well as the Customer Ticket/Order/Case Detail section using the tabs at the top.

  • Agent Desk: Customer details are only visible for ongoing chats (i.e., Live, Pending, Tagged) and not for tickets or closed chats.

  • Supervisor Desk: Customer details are only visible for ongoing chats and not for tickets or closed chats.

  • This is only available for the 3rd party integrations that have been configured in the Clickatell Portal.

  • In Agent Desk, the Integrations tab only appears if the customer is also present on one of your active providers.
💻
displayed on Chat Desk
Chat Desk Integration
Settings