Chat Desk User Guide
User GuidesRelease NotesFAQsSupport
  • 🏠Return to Home Page
  • 🔎Overview
    • Chat Desk Overview
  • 💻Chat Desk Dashboard
    • Access the Chat Desk Dashboard
    • Configure Chat Desk settings
      • Business profile
      • Chat tags
      • Auto responders
      • Preferences
      • Surveys
      • Canned replies
      • Integrations
      • Clickatell AI
    • Manage departments
    • Download transcripts
  • 🤝Agent Desk
    • Access & navigate the Agent Desk
    • Manage chat queues (Agent Desk)
      • Chats and tickets
      • Manage tickets
      • Pending chats
      • Close chats
    • Search, filter, and sort chats & tickets
    • Chat capabilities
      • Send attachments (media files)
      • Send voice recordings
      • Send emoticons
      • Share locations
      • Use canned replies
      • View chat events
      • Send 1-way SMS
    • Use suggested responses (Clickatell AI)
    • Authenticate customers
    • Send payment requests via Chat 2 Pay
    • View customer details from 3rd party applications
    • Send WhatsApp message templates
    • Transfer chats
    • Manage customer profile
  • 🦸Supervisor Desk
    • Access & navigate the Supervisor Desk
    • Manage chat queues (Supervisor Desk)
      • Chats and tickets
      • Manage tickets
    • Search, filter, and sort chats & tickets
  • 📊Reporting & Analytics
    • Dashboard Metrics
    • Clickatell Portal Reports
  • 💡Help & Information
    • What's New? 🎈
    • Release Notes
    • FAQs
    • Return to Home Page
Powered by GitBook
LogoLogo

© Copyright 2024 Clickatell. All rights reserved.

On this page
  1. Chat Desk Dashboard
  2. Configure Chat Desk settings

Business profile

PreviousConfigure Chat Desk settingsNextChat tags

Last updated 5 months ago

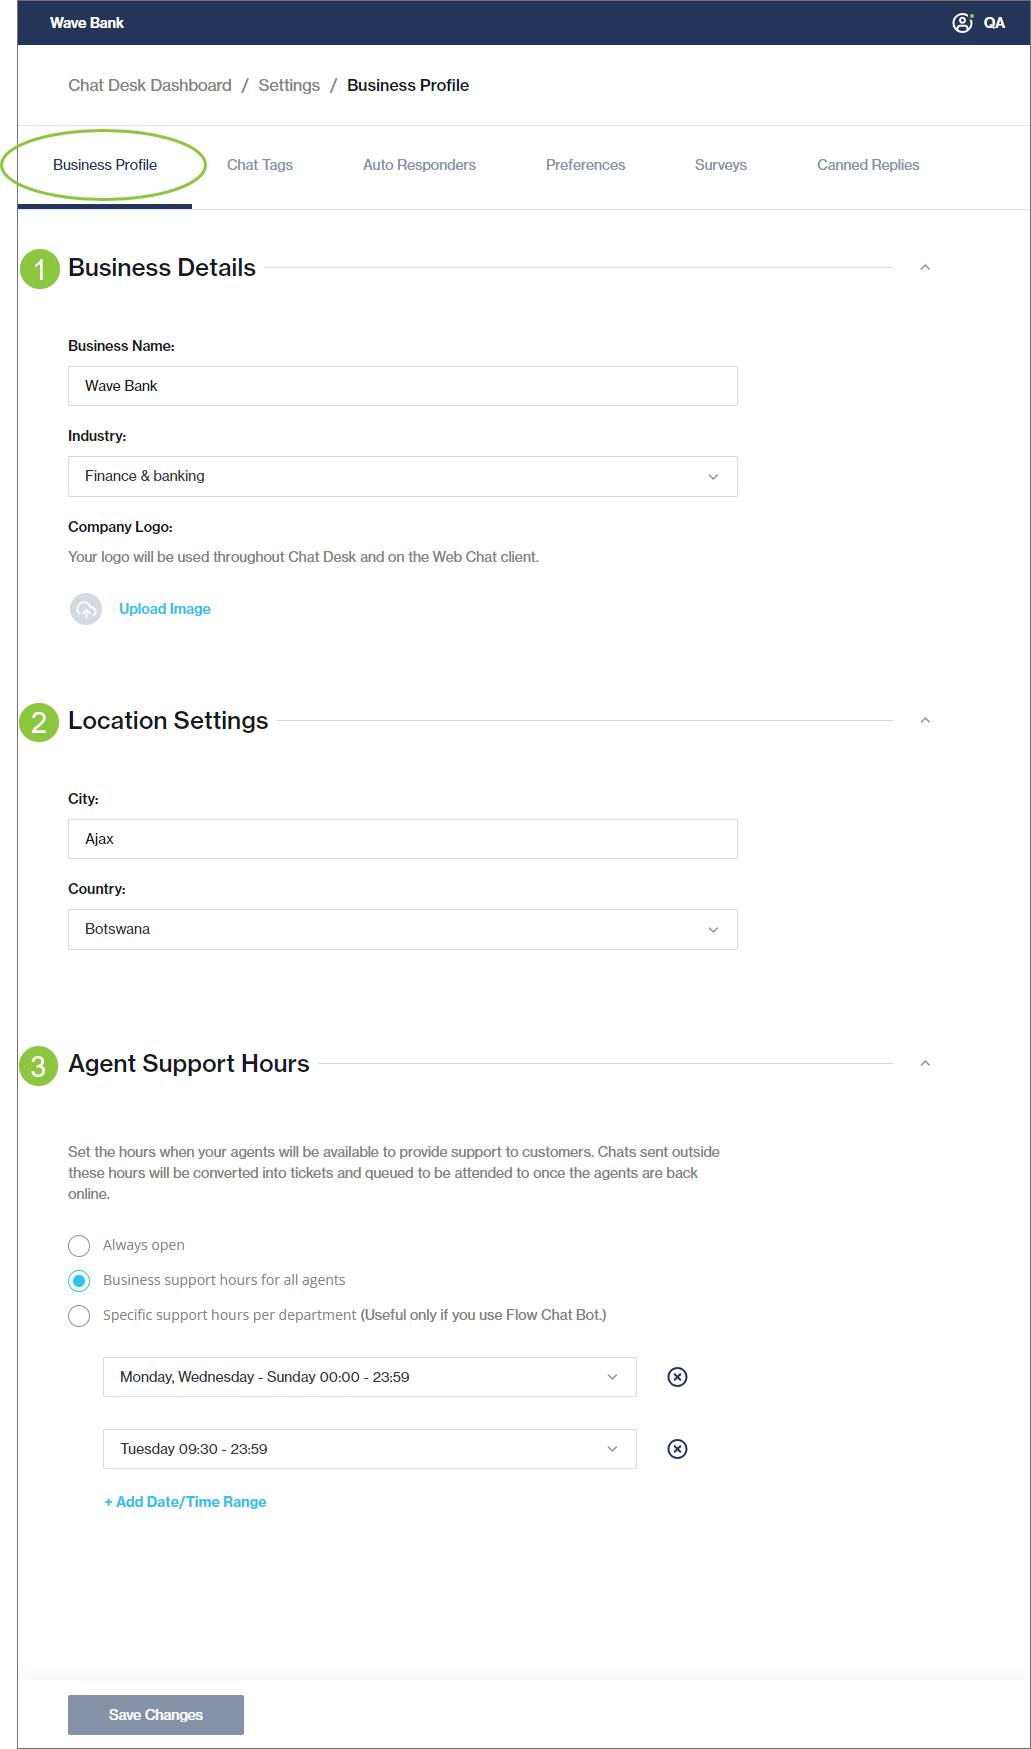
As a Supervisor, you can add/edit basic business profile settings by navigating to -> Business Profile.

  1. Business details: Add your business name and industry; add/update your business logo to display throughout Chat Desk.

  2. Location settings: Enter the city and country where your business is located.

  3. Agent support hours: Set the hours when your agents will be available to provide support to customers. Multiple slots can be set per department per day. If queries are received outside of these hours, they are automatically converted into tickets and the applicable is sent to your customer.

    • Always open (default): The customer can reach your agents 24/7.

    • Business support hours for all agents: Define the days and hours when support is available. The selected hours apply to all agents across all departments.

    • Specific support hours per department: Define the days and hours when each is available. Set the default support hours for those agents not assigned to a department.

Click Save Changes to update your Business Profile information.

💻
Settings
auto-responder
department