Add a new campaign
All timestamps in relevant time zones.
To add a new campaign:
In the Campaign List tab, click + New Campaign Setup.
Enter a name for your campaign to identify it easily (max. 255 characters).
Click Next.

When selecting SMS campaigns, a Health Check is shown to highlight if any issues are present that may hinder the successful execution of the campaign.

Setting up a WhatsApp Campaign
Select the message template you want to use.
The drop-down lists all WhatsApp templates that are already approved on your Clickatell account.
The message body populates automatically and is not editable.
For media templates, upload the file you want to add as the template header.
A preview of the message is shown on the right.
Note that marketing messages over 5 lines of text will be truncated for end-users with a "Read more" option to expand the message.
You can only select from the approved WhatsApp templates on your account. Find out how to apply for and manage your WhatsApp templates here.

The following template types and components are supported:
Media Header:
Document (PDF, 30 MB max size)
Video (MP4 or 3GPP, 5 MB max size)
Image (JPEG or PNG, 5 MB max size)
Text: As set up via the Clickatell Portal and approved by Meta. Must include at least one variable.
Quick replies: As set up via the Clickatell Portal and approved by Meta.
Static and dynamic URLs: As set up via the Clickatell Portal and approved by Meta.
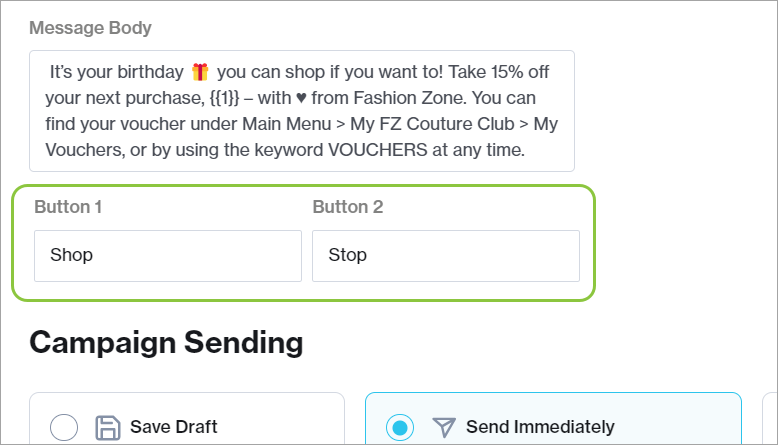
All buttons in the template are listed. If it is a call-to-action button, the number and URL(s) linked to each button are shown when hovering over it. This number will be dialed if an end-user taps the Call Phone Number button and the URL launched when they tap the Visit Website button. If the URL button is linked to a dynamic URL, it is shown in the format: https://example.com/order/{{1}}.

You cannot change the buttons' text on the templates, as these have been pre-approved. However, if you want to trigger a specific flow in Chat Flow when a customer taps a button, you must ensure the keyword in Chat Flow and the button keywords (as shown below) match exactly.

Select when you want to send your campaign:
Save a draft campaign to edit later.
Send the campaign immediately.
Schedule the campaign for a future date.

Indicate who must receive your campaign message.
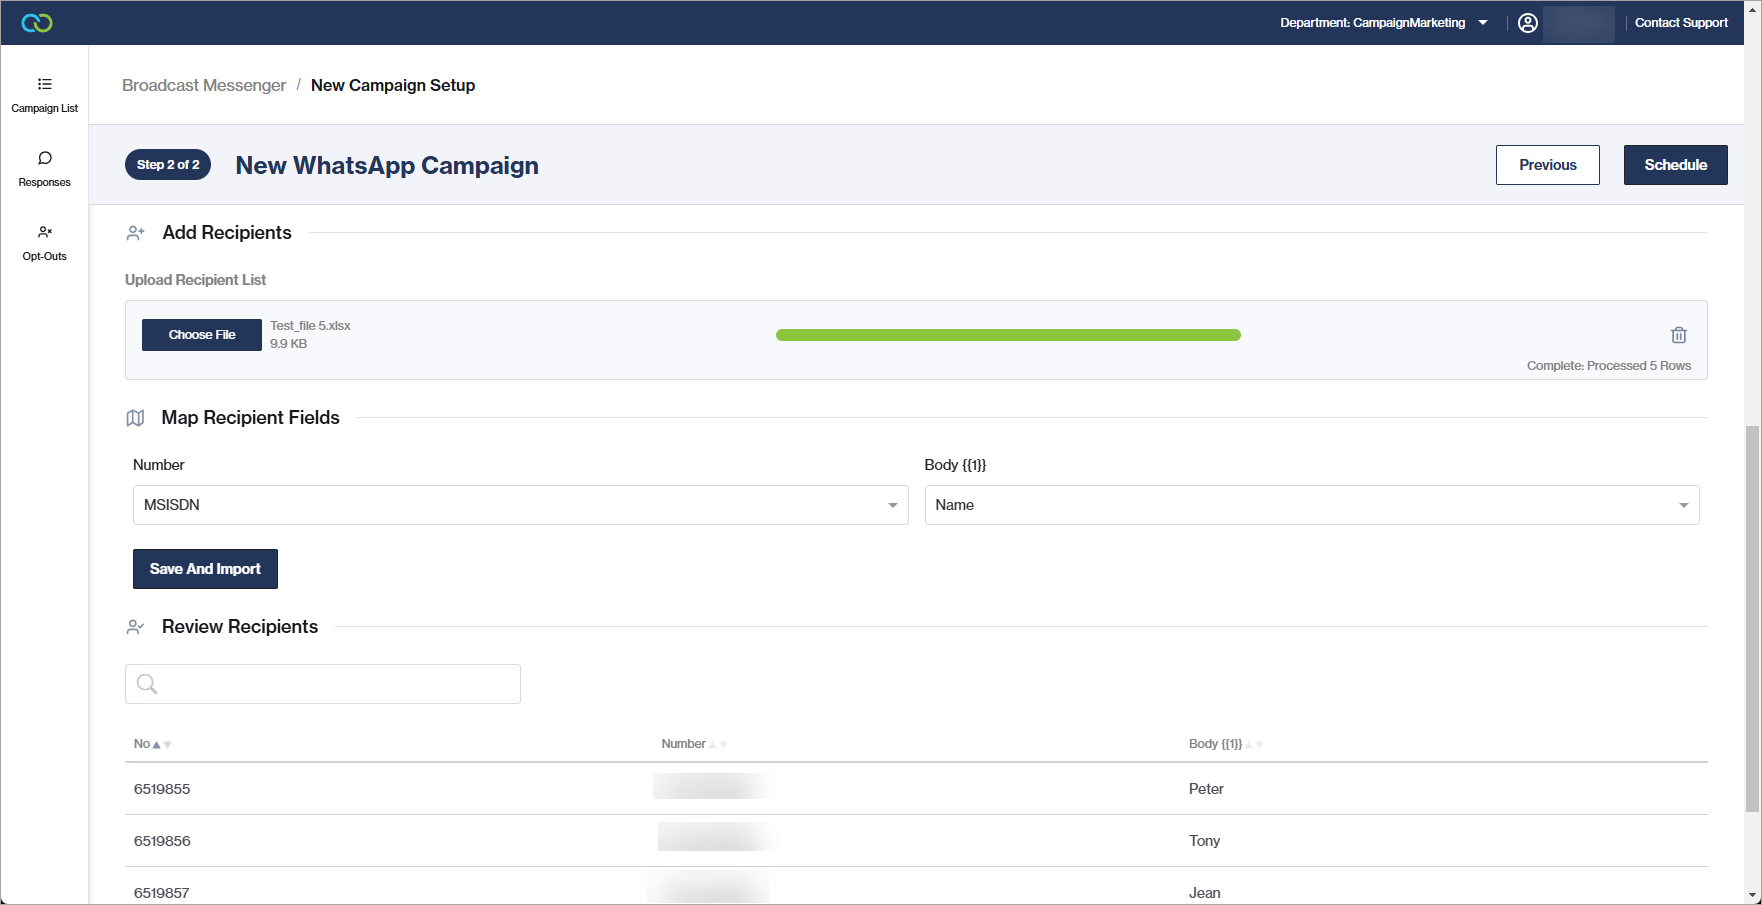
Upload a file from your computer (file types: .xlxs, .txt, or .csv; maximum 100MB; maximum 1 million rows).
In both cases, the column headings in your file are automatically shown as options in a drop-down for each variable in your message. From each drop-down, select the column that must be used to populate each variable.
File names may not contain a full stop. For example, use test_file1.csv instead of test.file1.csv. Commas need to be added at the end of each line. (For an example, see here.)
It is required to select a column containing the recipients' MSISDN numbers. All file columns should match the variables used in the message template.

Click Save and Import. The table displays an extract of the file you imported for review. You can search for a specific recipient using the MSISDN (mobile) number.

Click Save/Send/Schedule. This Campaign appears in the Campaign List tab with the applicable status.
Setting up an SMS Campaign
Select from which number the campaign must be sent.
This may be a requirement for delivery to certain countries (e.g., USA), or it may be possible to use a specific short-code or Toll-Free Number (TFN). You can select from your existing numbers.
Note that SMS responses are not visible within Broadcast Messenger, only Clickatell Portal.

Select the format of your SMS message:
Free text: Enter your campaign message as free text.
Template: Select from your pre-configured, active SMS message templates. You can modify the message body.

Add variables using the format {{1}} to {{9}}. The variables will map to the columns in the recipient file you upload (see 4 below).
Select when you want to send the campaign message:
Save a draft campaign to edit later.
Send the campaign immediately.
Schedule the sending of the campaign for a date in the future.

Indicate who must receive your campaign message:
Upload a file from your computer (file types: .xlxs, .txt, or .csv; maximum 100MB; maximum 1 million rows).
In both cases, the column headings in your file are automatically shown as options in a drop-down for each variable in your message. From each drop-down, select the column that must be used to populate each variable.
Click Save and Import.

File names may not contain a full stop. For example, use test_file1.csv instead of test.file1.csv. Commas need to be added at the end of each line. (For an example, see here.)
It is required to select a column containing the recipients' MSISDN numbers. All file columns should match the variables used in the message template.
Click Save/Send/Schedule in the top right corner. This Campaign will now appear in the Campaign List tab with the applicable status.
Last updated